When I have a lot of knitting to do, I start early. If I am knitting for Christmas, I start in August. I knit a cardigan for winter this year, before the winter ended... if it has, that is of course debatable with the British weather! In this case, its thank you gifts for my son's school teachers.
A bit of context first. We became aware that our son wasn't engaging with pre-school in a typical way a term after he started. We quickly then began the referral to speech therapy, and that steamrolled into other referrals as it became obvious that his difficulties were not speech related, but with social communication and dealing with social situations. That hinted at something else. Things have progressed, and we had his future reception teachers involved in meetings about what he needed support wise in the spring before his transfer to reception in September last year. They have already been working with him a year even though there is a term left of this academic year.
In January he was formally diagnosed as mildly affected with Austim Spectrum Disorder, which explained a lot of his difficulties. but even prior to this, (and knowing it was likely) from the instant he joined reception year at school the teaching team have been incredible. Where he struggled in pre-school, after a bumpy start he's really taken to school, settled in, and is flourishing. The last parent's evening was incredible, singing his praises, saying he's doing well in all areas, even making good ground in his social skills, even if it is his weakness. They have worked so hard, he has special sessions with the head teacher (who unfortunately is retiring at the end of the academic year) because he is ahead in Maths, (amongst other subjects but Maths is his powerhouse subject) and they are doing their utmost to keep stretching him, keep him engaged, and interested in school. The more new things he is learning, the happier and more settled he is. He's an academic at heart.
In short, the time and effort they are putting in, giving him extra one to one teaching and support is helping him reach his true potential, and he's truly shining thanks to them. And at the end of the year, he will be moving to new teachers (who he is already getting to know), new teaching assistants, and a new head. But I do want to thank them for all they have done for him. I know they will all get chocolates and mugs and all kinds of things like that, but those are easy. they don't really value what the ladies have put in, that thing which is so hard to put a value on. Time. And I wanted to thank them by giving them the same thing back from me. Time. Something that took hours of my time to make, like they put hours of their time into my son.
So I have begun an ambitious project. The idea is to have a scarf ready for the end of year for each of the team. Two class teachers, one head teacher and three teaching assistants... that's right, six of them. Hence I am starting early.
The pattern I have chosen is Boo Knits Dragonfly Wings. A lovely little scarf come shawlette, made with very little yarn, quick to make, but with pretty lace. In a variety of yarns, some lace weight, some fingering weight, and 4 out of the six yarns I have spun myself. I finished the first of the six in some handspun lace over the weekend:
Its a lovely pattern, very quick and easy, and I can knock out one of these in a few days. Which is good, because July will be here before I know it!
I can admit, while I can see the ladies in question often wear decorative scarves, I don't know a huge amount about each of their colour choices. So my plan is to knit in a mix of colours and textures, some brights, some muted, because the age ranges of the ladies are varied, and to give them as one big package and allow them all to choose their favourites. As such, here are the other five yarns:
A real range, including the two gradient skeins in the middle. Hopefully there will be something for everyone in there. I am currently working on the gold, so watch this space for more FO's! I really hope this will be something out of the ordinary for the ladies, and truly thank them for their invaluable work with children, and my son in particular!
Till next time
Monday, 31 March 2014
Monday, 17 March 2014
Tricsi
Hi to all. This is a project I wanted to share sooner, but just as I was ready to take pictures of my lovely finished cardigan, the sunshine upped and left for a few days leaving me with nothing but mist, and no light to take pictures in. Which was pretty useless. But here I am with my latest FO.
As I was saying in my last post, my mother was very kind and knit my miss all kinds of cardigans and sweaters for this past winter, leaving me without the chance to knit for her. Not that I am ungrateful, far from it, I have loved those cardigans and miss has been wonderfully warm! But I would like to make my mark on the next winter, so I made a start. You saw this cardigan in progress in my last post and now its finished.
The pattern I chose was Tricsi, designed by Åsa Tricosa, because I love the look of the pattern, though reading the comments and notes was a little daunting, as it has a very unusual construction. But I was up for the challenge. And the designer is on Ravelry which meant if I got truly stuck, I could message her directly, or ask for help on the forums. So I chose some beautiful yarn, Wollmeise Merino DK weight, a huge 200g of soft smooshy goodness, in the colour Turkise Markise:
Its nigh on impossible to photograph this colour and get it true on my screen. Its greener (though not by much), but still incredibly turquoise with the amazing colour saturation that Wollmeise has. And is a colour I love. I whipped out my christmas present from my hubby, my Knit Pro Karbonz interchangeable needles, took a deep breath, and followed every instruction to the letter.
I have to admit, the contiguous construction is by far the oddest I have ever come across, even if the effect is lovely, and not too hard to follow if you take your time and study the pictures provided in the pattern. Once I got into the swing of what the designer intended, I actually really enjoyed it. And the provisional cast on she used was new to me, but absolutely brilliant and easy to do, allowing me to knot in both directions from the back of the neck with no hassle. It was frankly all very cool. And I love the result:
The yarn is another one that need to go into the washer and dryer, or my cardigan for a 2 year old could almost fit my nearly five year old, but with a tumble dry it snaps back really well, and is soft and smooshy, just as in the ball. Really very pleased and look forward to her toddling round in it when the next winter comes. If this one ever leaves!
Till next time!
Friday, 28 February 2014
What I'm doing now
This seemed to be an appropriate title for a post, seeing as I have nothing finished to share this week. That's pretty much down to the nature of the crafty things I am currently up to, two of which are much longer term projects. So I thought rather than letting my blog go completely quiet, I would share what I am currently in the process of making.
First long term project, the crochet blanket. This is meant for my little miss' second birthday (as I knit her brother a blanket for his second birthday and it is still very beloved. Its only fair right?). Its also the blanket I was working on when I took pictures for last week's phototutorial
Its now as wide as I want (having laid it in her bed to check) and now I just need to make it lots longer!
Second project is the long term spinning project. I now have one full bobbin:
Now more into the blue end of the gradient, getting there slowly. When I can find a bit of peace I get half an hour done here, half an hour there, and one day, this will be finished. Then I foresee lots and lots of thicker spinning for quick gratification!
And lastly another project for the miss. This time a cardigan, in age two, for when autumn hits.
Yes I know its not even spring, but I like to be ahead of the game and have them in her drawer ready for when the weather hits. And given how much my mum knitted for her last year I'd like to get more of mine on her back this year ;) Not that I begrudge my mother knitting for her, she needed something to do those long months off work after her operation. And she has been lovingly wrapped in knits all winter so its a good thing.
That is such a horrid colour to photograph. Hopefully when its finished I might get some sunshine to try and get an accurate colour capture... I can only hope! But as you can see, sleeve stitches are on hold, and I'm a good way down the body now.
So that's what I am up to at the moment. What crafty projects have you all got on the go?
Till next time.
First long term project, the crochet blanket. This is meant for my little miss' second birthday (as I knit her brother a blanket for his second birthday and it is still very beloved. Its only fair right?). Its also the blanket I was working on when I took pictures for last week's phototutorial
Its now as wide as I want (having laid it in her bed to check) and now I just need to make it lots longer!
Second project is the long term spinning project. I now have one full bobbin:
And have started trucking on with the second:
And lastly another project for the miss. This time a cardigan, in age two, for when autumn hits.
Yes I know its not even spring, but I like to be ahead of the game and have them in her drawer ready for when the weather hits. And given how much my mum knitted for her last year I'd like to get more of mine on her back this year ;) Not that I begrudge my mother knitting for her, she needed something to do those long months off work after her operation. And she has been lovingly wrapped in knits all winter so its a good thing.
That is such a horrid colour to photograph. Hopefully when its finished I might get some sunshine to try and get an accurate colour capture... I can only hope! But as you can see, sleeve stitches are on hold, and I'm a good way down the body now.
So that's what I am up to at the moment. What crafty projects have you all got on the go?
Till next time.
Friday, 21 February 2014
Crochet Magic Ring Tutorial
Hi to one and all, and apologies for not having put up a post in a while. Its most definitely down to germs in the house that have zapped all life out of us!
So, today I have a first for the blog. A photo tutorial. I don't know if it will be useful to anyone, or whether anyone will like it, but I thought I would try it out, and if people want more, I shall do my best to provide!
So, the Magic Ring in crochet. What is it? Quite simply its a way of starting a circle without using a slip knot, and providing more space to work the initial round into the ring, which is what makes it popular. However, it takes a little practice. But once you have the hang of it, then its an invaluable technique to have in your arsenal. Its one I am using a lot, making an African flower motif blanket for my daughter. And it was crocheting one of these blocks where I took the pictures for this tutorial. SO, how do we do it.
Step one:
Assuming you are right handed, put your ball of yarn on your left, and wrap the end of your yarn round two fingers of your left hand twice, so that the yarn end is on the right:
Completed:
Step four:
Use your right hand to pinch and hold beneath your stick as you slip your fingers from the ring. Tension your working yarn in your left hand as suits you, and take over pinching the ring with you left hand. Now work your first stitch. - In my case, chain three
Like so. I am working my stitches around both loops here, this is important.
Step six:
You have now completed your first round, and completed a slip stitch into the first stitch to complete the ring (I have also cut my yarn as I am changing colour, but do what suits your current pattern). For reference I worked 2 treble crochet, chain one eight times all around (ENGLISH terms. 2 double crochet, chain 1 in american). And you will have this odd bit of slack, and it will look a bit funky, like below:
But this is the 'magic bit. With your yarn tail in the back, and on your left (as below), gently tug on the yarn tail until it starts to take up all the slack and it draws your ring up nice and tight:
So, today I have a first for the blog. A photo tutorial. I don't know if it will be useful to anyone, or whether anyone will like it, but I thought I would try it out, and if people want more, I shall do my best to provide!
So, the Magic Ring in crochet. What is it? Quite simply its a way of starting a circle without using a slip knot, and providing more space to work the initial round into the ring, which is what makes it popular. However, it takes a little practice. But once you have the hang of it, then its an invaluable technique to have in your arsenal. Its one I am using a lot, making an African flower motif blanket for my daughter. And it was crocheting one of these blocks where I took the pictures for this tutorial. SO, how do we do it.
Step one:
Assuming you are right handed, put your ball of yarn on your left, and wrap the end of your yarn round two fingers of your left hand twice, so that the yarn end is on the right:
Step two:
Holding your yarn tail in whatever way is most comfortable, use your crochet hook to catch the top loop (the working yarn) and pull a loop under:
Step three:
With that loop on your hook, slip your hook under the top loop (working yarn) again to chain into the loop on your hook. This locks the ring and allows you to work it.
Completed:
Step four:
Use your right hand to pinch and hold beneath your stick as you slip your fingers from the ring. Tension your working yarn in your left hand as suits you, and take over pinching the ring with you left hand. Now work your first stitch. - In my case, chain three
Step five:
I personally find that my ring can twist a bit in this process, and now we have our stitch complete and anchored, now is a good time to let go of the ring and make sure the yarn is lying right within it. In the picture below you can see the tail loops round nicely in an anti clockwise direction. You want to make sure you have both of those loops on the left of your stictch like this, as you are going to work your entire round around both of these loops.
Like so. I am working my stitches around both loops here, this is important.
Step six:
You have now completed your first round, and completed a slip stitch into the first stitch to complete the ring (I have also cut my yarn as I am changing colour, but do what suits your current pattern). For reference I worked 2 treble crochet, chain one eight times all around (ENGLISH terms. 2 double crochet, chain 1 in american). And you will have this odd bit of slack, and it will look a bit funky, like below:
But this is the 'magic bit. With your yarn tail in the back, and on your left (as below), gently tug on the yarn tail until it starts to take up all the slack and it draws your ring up nice and tight:
And there you have it, one nice, tight circle, that you already know the tail has been woven round the bottom of each stitch in the ring twice, so is nice and secure. Great for the top of hats, the centre of motifs, anything you like really. The space is much easier to work into than a straight ring made from chaining four times and joining!
I hope that is useful to someone! If you like this tutorial and would liek to see more, please let me know, and I will see what I can do!
Till next time!
Sunday, 9 February 2014
Gradient Dress
First things first, I seem to have some new readers to my blog, and I want to say thank you to you all for taking the time to read. And thank you to all who comment too! Its really so nice when people take the time!
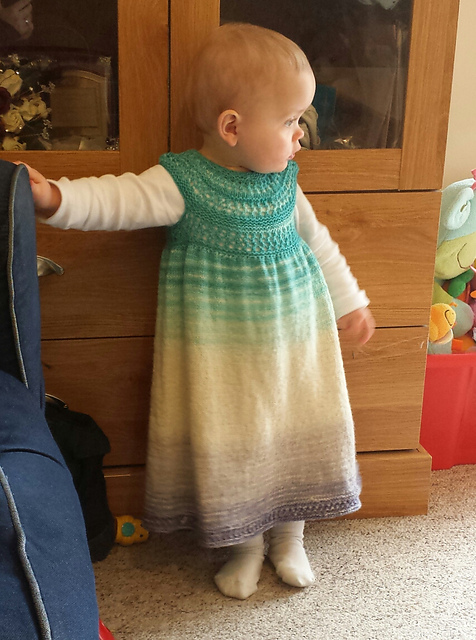
So I have finished my daughter's dress!I knew I loved the pattern anyway as I have used it before, as I showed in my last blog post. For those curious, its the Mischa Baby Dress pattern by Taiga Hilliard Designs. I love it because its completely seamless and there's no sewing at the end, just two ends to weave in.
I have a tendency towards gradients when making my miss dresses. This is in fact my third, and my source for the yarns has always been the same. Jon of Easyknits.co.uk does a shawl club. You sign up for each round not knowing what the pattern or colours are going to be. He makes the yarns by machine knitting 'blanks' and dyeing them to get the slow colour changes. Here is the one I used for the dress all in a squishy roll:
The blanks are made from Blue Faced Leicester yarn, 100% wool so hand wash, but I personally have no problem with that. The colour above was from the shawl club and called Frostbite. I picked it up in a destash. I have knitted the pattern this was designed for but I just love using the rolls for dresses. Can't help myself it seems. He sometimes does a batch of rolls on the shop itself, not just for the club. I have one of those in my stash too. Another dress another day maybe ;)
I already showed the work in progress pictures last week so I thought I would skip to the finished item in this case. I just about got the miss to stay still long enough to get pictures of her wearing it, but she is just figuring out this walking lark and staying still really doesn't happen.
Front:
And back, with the sparkly buttons I chose for her
As you can see I made it quite long, basically because I don't want her to grow out of it too fast. Her very first knitted dress is starting to look more like a tunic now, but as long as it fits round her chest, she can still wear it with leggings or jeans, and her dresses have kept her cosy all winter. And being the UK... I am sure they will be keeping her warm for a while yet!
So folks, do check out easyknits.co.uk and see what lovelies Jon has. I must state that at the time of writing, the site is due to go offline for a short while to be revamped and relaunched, so if you find the site is down, have some patience and check back!
So do any of you like hand knits for your little ones?
Till next time!
So I have finished my daughter's dress!I knew I loved the pattern anyway as I have used it before, as I showed in my last blog post. For those curious, its the Mischa Baby Dress pattern by Taiga Hilliard Designs. I love it because its completely seamless and there's no sewing at the end, just two ends to weave in.
I have a tendency towards gradients when making my miss dresses. This is in fact my third, and my source for the yarns has always been the same. Jon of Easyknits.co.uk does a shawl club. You sign up for each round not knowing what the pattern or colours are going to be. He makes the yarns by machine knitting 'blanks' and dyeing them to get the slow colour changes. Here is the one I used for the dress all in a squishy roll:
The blanks are made from Blue Faced Leicester yarn, 100% wool so hand wash, but I personally have no problem with that. The colour above was from the shawl club and called Frostbite. I picked it up in a destash. I have knitted the pattern this was designed for but I just love using the rolls for dresses. Can't help myself it seems. He sometimes does a batch of rolls on the shop itself, not just for the club. I have one of those in my stash too. Another dress another day maybe ;)
I already showed the work in progress pictures last week so I thought I would skip to the finished item in this case. I just about got the miss to stay still long enough to get pictures of her wearing it, but she is just figuring out this walking lark and staying still really doesn't happen.
Front:
And back, with the sparkly buttons I chose for her
As you can see I made it quite long, basically because I don't want her to grow out of it too fast. Her very first knitted dress is starting to look more like a tunic now, but as long as it fits round her chest, she can still wear it with leggings or jeans, and her dresses have kept her cosy all winter. And being the UK... I am sure they will be keeping her warm for a while yet!
So folks, do check out easyknits.co.uk and see what lovelies Jon has. I must state that at the time of writing, the site is due to go offline for a short while to be revamped and relaunched, so if you find the site is down, have some patience and check back!
So do any of you like hand knits for your little ones?
Till next time!
Monday, 3 February 2014
Works in Progress
I don't actually have anything finished to share this week, and am working on a couple of things at once. And that's around planning a birthday cake for the small boy. I will be trialling the baking of that later this week and taking it to toddler group to share. I really am not leaving myself with 22cm square chocolate cake in the house with little help to eat it! All the weight I lost recently... straight back on! Its going to be shared!
So what am I working on?
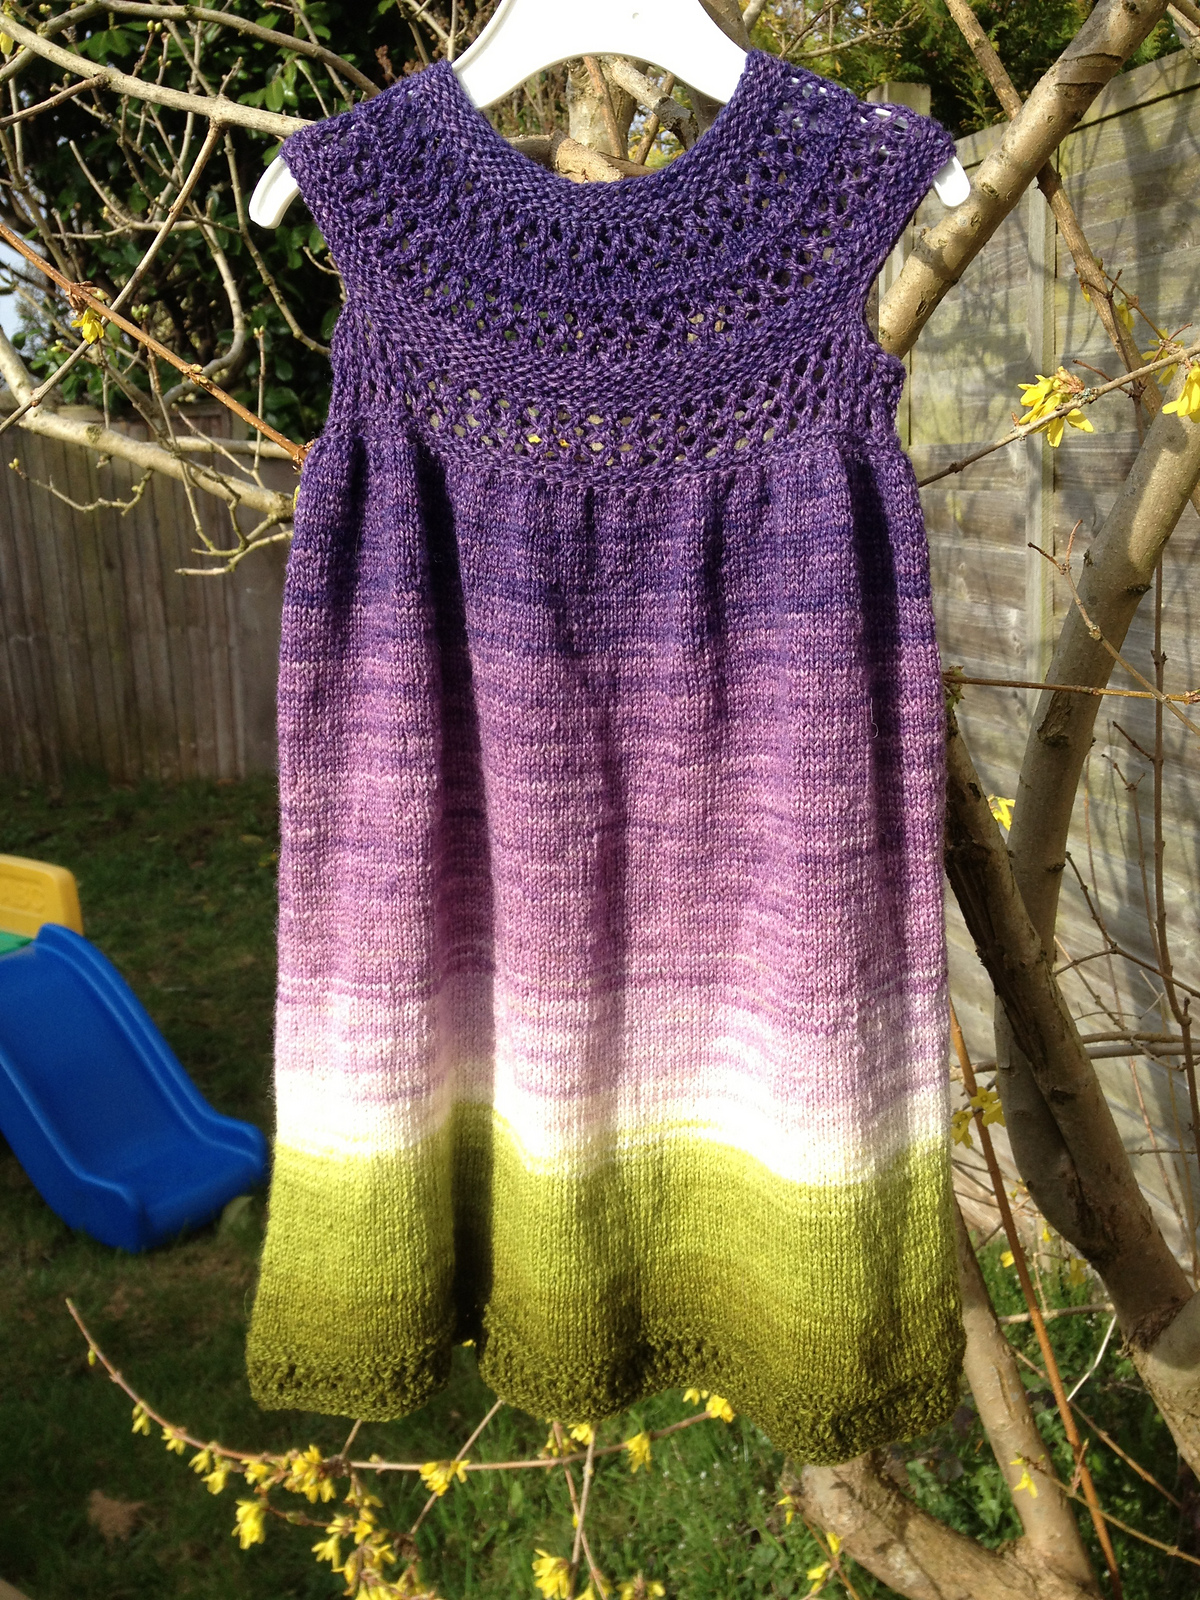
This week is all about gradients it seems. Firstly a dress for my little miss. She actually has one in this pattern already in a gradient from purple to green:
I will explain where I get the yarn from when I finish the dress, but the current one is here.
Most of the way down the skirt which will finish in a grey blue. And will look a lot better after a wash and dry on a hanger as you can see above! Its a super pattern, no seams, knit all in one piece and super cute on my madam!
I am also carrying on with some spinning. I have been spinning this braid of superwash merino:
Really very fine:
and am now over half way through. But spinning this fine takes a lot of hours!
On top of that I have two blankets I really should pull out and work on too. I am thinking finish the dress and give them some love, as one blanket should be for miss, but I need to actually do some work on it for that to happen, and the sock yarn blanket is always going to be a slow grower. But it won't grow at all if it sits in its bag. Time for some blanket love after the dress I think!
So that's what I am currently up to. What are you crafty people all doing?
Till next time.
Sunday, 26 January 2014
Here Comes The Bride!
When a friend of mine wanted to invite me to her wedding, I was thrilled. Except for one thing. For reasons beyond my control I am unable to go. But that did not stop me from wanting to do something special since I can't be there. I know that bridal shawls are far from the norm here, but I offered, and she said she would love it. So I said I would, as my wedding gift. I would make her a shawl in any shape she liked. So I showed her different shapes and patterns until we found one that she loved and said 'that's the one'. I bought some lovely lambswool/angora bunny blend yarn which would be light, warm and luxurious, and got to work.
The pattern she chose was the Japanese Feather and Fan shawl by IzzyKnits. A lovely pattern, but one I wanted to enlarge some, and spent some time scratching my head about how to do it. But I did figure it out, and if anyone wants to know how, I made notes on my project in Ravelry. Feel free to use my adaptations!
It was a lovely pattern to work, quite easy compared to some I have work, but amazingly effective. Though by the time I had enlarged it and got to the border I had nearly 770 stitches on the needle! The rows took some time to complete then. But totally worth it. I cast off a few days ago, then to blocking.
Blocking is an interesting process, as it really makes lace shine when you hard block. Though soaking your knit then stretching it out to within an inch of its life takes some courage the first time you do it. Here's the shawl on the blocking mats:
Not the best view of it, but perhaps this before and after will give an idea of the difference the process makes.
Before:
All bumpy, curly and bunched up
After:
And in close up, before:
and after:
It makes a huge difference and makes it look so much more polished.
I am immensely pleased with it, and about to send it off to my bride to be very soon, and I really hope she loves it and it keeps her warm on her special day. Its been knit with love in every stitch, and hope for a long and happy marriage. A great big hug from me when I can't be there! So there it is finally, the special big shawl I have been working on.
Now onto the next project, a dress for my little miss!
Till next time!
The pattern she chose was the Japanese Feather and Fan shawl by IzzyKnits. A lovely pattern, but one I wanted to enlarge some, and spent some time scratching my head about how to do it. But I did figure it out, and if anyone wants to know how, I made notes on my project in Ravelry. Feel free to use my adaptations!
It was a lovely pattern to work, quite easy compared to some I have work, but amazingly effective. Though by the time I had enlarged it and got to the border I had nearly 770 stitches on the needle! The rows took some time to complete then. But totally worth it. I cast off a few days ago, then to blocking.
Blocking is an interesting process, as it really makes lace shine when you hard block. Though soaking your knit then stretching it out to within an inch of its life takes some courage the first time you do it. Here's the shawl on the blocking mats:
Not the best view of it, but perhaps this before and after will give an idea of the difference the process makes.
Before:
All bumpy, curly and bunched up
After:
And in close up, before:
and after:
It makes a huge difference and makes it look so much more polished.
I am immensely pleased with it, and about to send it off to my bride to be very soon, and I really hope she loves it and it keeps her warm on her special day. Its been knit with love in every stitch, and hope for a long and happy marriage. A great big hug from me when I can't be there! So there it is finally, the special big shawl I have been working on.
Now onto the next project, a dress for my little miss!
Till next time!
Subscribe to:
Posts (Atom)